Quick & Easy CakePops
1/ A Strong Foundation
The first trick to making cakepop dough is using butter as the fat component in your cake. Many bakers use oil because it keeps the cake soft and moist even when it is refrigerated. Although this is great for cakes, this additional moisture and softness will be detrimental to your cake pops. By substituting butter for oil your cake will have the perfect texture for crumbling and manipulating into a smooth and pliable dough that will lead to the perfect cake pop.
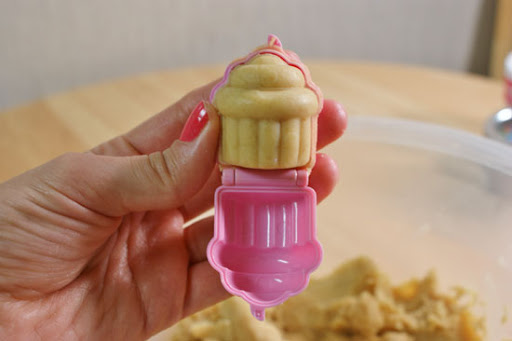
2/ Forming the balls or custom shapes.
The next step is forming your cake pops. You can choose to do the traditional ball shape or be bit adventurous and try a custom shape, either way, if your dough is made correctly, whatever shape you choose will hold its form.
Any one who knows me knows that I love going the adventurous route but I am also a fan of "working smarter and not harder", therefore regardless of whether I am doing traditional shapes or custom shapes, I prefer to use Cakepop Molds. These molds make uniform cake pops in a matter of seconds, saving time and eliminating the risk of oily and overheated dough from over-handling.

Helpful Hint!
While forming the cakepops, place them on a covered tray until all are complete. By doing this, especially in a dryer climate, it stops cake pop from drying out and therefore splitting when you go to insert the lollipop stick.
3/ Sticking and Dipping
Here comes the true test of your 'cake popping' abilities! Melt your chocolate or molding wafers (you want it to be a thick runny consistency that will allow the excess to drip off of the pop but not too thin that it runs off completely!) Dip your lollipop stick approximately 1/2 of an inch into the melted chocolate, shake off the excess and insert the stick 1/3 of the way into the cake pop. Let it sit for a few minutes for the chocolate to set. At this point you can pop the chocolate back into the microwave for a few seconds to warm it up again. When the pops are set securely to their sticks, dip them one by one, allowing the excess chocolate to drip from each one before setting it aside to harden. (If you are dipping a pop in two different colours of chocolate, make sure you allow the first colour to set completely before dipping the pop into the second colour.)
Helpful Hint!
Remember, if you are adding any decorations to the cake pops such as sprinkles etc, you should do this while the chocolate is still wet to ensure that they adhere securely to your pops. However, if your chocolate sets before you have had a chance to add your decorations, you can pour some of the chocolate into a pipping bag, cut the tip to create a small hole for the chocolate to come through and pipe the chocolate on the portion of the pop that you would like to add the decorations to and do so before it sets.
I hope this post is helpful to all of you budding cake-poppers!
Stay tuned for more posts and helpful tips for creating amazing treats!
Contributed By:
ALLYSEN C. LAYNE
- Allysen Layne


Comments 0